Kactus2
Kactus2 reference guide
Loading...
Searching...
No Matches
Kactus2 scripting examples

Here are some simple examples on how to use Kactus2 via Python scripting.

Note
After running scripts in GUI, changes made to documents (components, designs) won't be visible until the document is refreshed in the GUI.

Setting up IP-XACT libraries

IP-XACT libraries can be set either in the GUI or via Python. Currently configured library paths can be listed with PythonAPI::getAllLibraryPaths or PythonAPI::getActiveLibraryPaths, and PythonAPI::getDefaultLibraryPath (for the current default), e.g.;

from pythonAPI import PythonAPI
kactus2py = PythonAPI()
print(kactus2py.getAllLibraryPaths()) # Lists all configured paths
print(kactus2py.getActiveLibraryPaths()) # Lists paths currently set active = where Kactus2 looks for IP-XACT files
print(kactus2py.getDefaultLibraryPath()) # Lists the current default library path
Interface for accessing Kactus2 data using Python.
Definition PythonAPI.h:66

Libraries can be added with PythonAPI::addLibraryPath and removed with PythonAPI::removeLibraryPath. Libraries can be set in bulk with PythonAPI::setLibraryPaths, which will add and set active all paths that are given as a list in the function arguments. PythonAPI::setDefaultLibraryPath sets the default location.

kactus2py.addLibraryPath("C:/some/path", False) # optional second argument sets active (True) or inactive (False), active by default
kactus2py.setDefaultLibraryPath("C:/some/path")
kactus2py.setLibraryPathActive("C:/some/path", True) # set the earlier path active
...
kactus2py.setLibraryPaths(['C:/some/new/path', 'C:/another/new/path']) # Replaces the active library paths and also sets the first listed path as default

Creating a component

Creating a component is done with PythonAPI::createComponent. As parameters, it takes the VLNV (vendor, library, name, version) of the component to be created, one parameter each, and the IP-XACT standard revision to use (PythonAPI::StdRev). Example:

# Create component with VLNV Company:Lib:ComponentName:1.0 using IP-XACT 2014
vendor = "Company"
library = "Lib"
name = "ComponentName"
version = "1.0"
kactus2py.createComponent(vendor, library, name, version, kactus2py.Std14)

The created component will be placed in the default library path.

Note
Supported standard revisions are Std14 and Std22 and the default value is Std22.

The IP-XACT standard revision of a component can be checked with PythonAPI::getComponentStdRevision :

revision = kactus2py.getComponentStdRevision() # Returns "1685-2014" in this case

Creating a design and adding a component instance

Similarly to creating components, a design can be created with PythonAPI::createDesign:

designName = "AwesomeDesign"
designVersion = "1.0"
kactus2py.createDesign(vendor, library, designName, designVersion, kactus2py.Std14)

The IP-XACT standard revision of a design can also be checked with PythonAPI::getDesignStdRevision.

Creating a design will create 1) The design itself and 2) A top-level component for the design. The top-level component VLNV will become vendor:library:name:version and the design VLNV will become vendor:library:name.design:version. The design will be created in the default library.

The component can then be instantiated and added to the design. Creating a design will automatically set it as active, but in any other case the design must be set active with PythonAPI::openDesign, which takes the design VLNV as a vlnvString (vendor:library:name:version).

The component can be instantiated and added to the design with PythonAPI::addComponentInstance, which also takes a vlnvstring and the instance name:

kactus2py.openDesign(":".join([vendor, library, designName + ".design", designVersion]))
kactus2py.addComponentInstance(":".join([vendor, library, name, version]), "NewInstance")

Changes to a design are saved with PythonAPI::saveDesign, which will write the changes to disk. The currently open design can be closed with PythonAPI::closeOpenDesign:

kactus2py.saveDesign()
kactus2py.closeOpenDesign()

Modifying components

Modifying a component requires that the component is opened first:

kactus2py.openComponent(":".join([vendor, library, name, version])) # open Company:Lib:ComponentName:1.0

Now any changes made will be made to the opened component.

Note
The following code examples generally don't include any error checks. Most setters return a boolean value, which can be used for detecting errors.

Modifying component memory maps

Any modifications to component memory maps are made through KactusAPI interfaces. Memory maps can be modified via MemoryMapInterface, and it can be accessed with PythonAPI::getMapInterface. Address blocks, registers and fields can be modified in a similar way.

Creating a memory map

A new map can be added with MemoryMapInterface::addMemoryMap. It takes an index as first parameter and the name as the second parameter. The index can be in the range [0, number of memory maps in the component], the easiest thing to do is always use index 0.

mapInterface = kactus2py.getMapInterface()
mapInterface.addMemoryMap(0, "NewMemoryMap")

The memory map can then be modified with the different functions of MemoryMapInterface, e.g. to set the address unit bits:

mapAubOk = mapInterface.setAddressUnitBits("NewMemoryMap", "8") # returns True, if operation was successful, otherwise False

Adding address blocks

The address block interface can be accessed with MemoryMapInterface::getAddressBlockInterface. The interface must first be pointed to the memory map whose address blocks are to be edited:

kactus2py.setBlocksForInterface("NewMemoryMap")
blockInterface = mapInterface.getAddressBlockInterface()

A new address block can be added with AddressBlockInterface::addBlock. Its properties can be accessed in the same way as with memory maps:

blockInterface.addBlock(0, "NewAddressBlock")
widthOk = blockInterface.setWidth("NewAddressBlock", "32")
...
blockInterface.getWidth("NewAddressBlock") # returns "32"

Adding registers and fields

Register and field interfaces are accessed through AddressBlockInterface::getSubInterface and RegisterInterface::getSubInterface respectively. Apart from that they work as the previous interfaces. First, the available registers (the registers of the created address block) must be set for the register interface:

kactus2py.setRegistersForInterface("NewMemoryMap", "NewAddressBlock")
regInterface = blockInterface.getSubInterface()

Then the register properties can be manipulated:

regInterface.addRegister(0, 0, "NewRegister")
regInterface.setSize("NewRegister", "16")

Field editing is done in a similar fashion. First, the available fields must be set for the interface:

kactus2py.setFieldsForInterface("NewMemoryMap", "NewAddressBlock", "NewRegister") # now editing fields of "NewRegister"

After that fields can be edited through the field interface:

fieldInterface = regInterface.getSubInterface()
fieldInterface.addField(0, "NewField")
newWidthOk = fieldInterface.setWidth("NewField", "8") # most setters return a boolean value for checking if operation was successful
widthNotOk = fieldInterface.setWidth("non-existing-field", "8") # this would return false in this example

Modifying component bus interfaces

The components bus interfaces are directly accessible through the BusInterfaceInterface class, after PythonAPI::openComponent has been called.

In this example, we'll first create some ports for our component. Then, we'll create a bus interface and some portmaps for it. For mapping ports, we need a bus- and abstraction definition, which cannot be created via the python API, but can be created in the GUI.

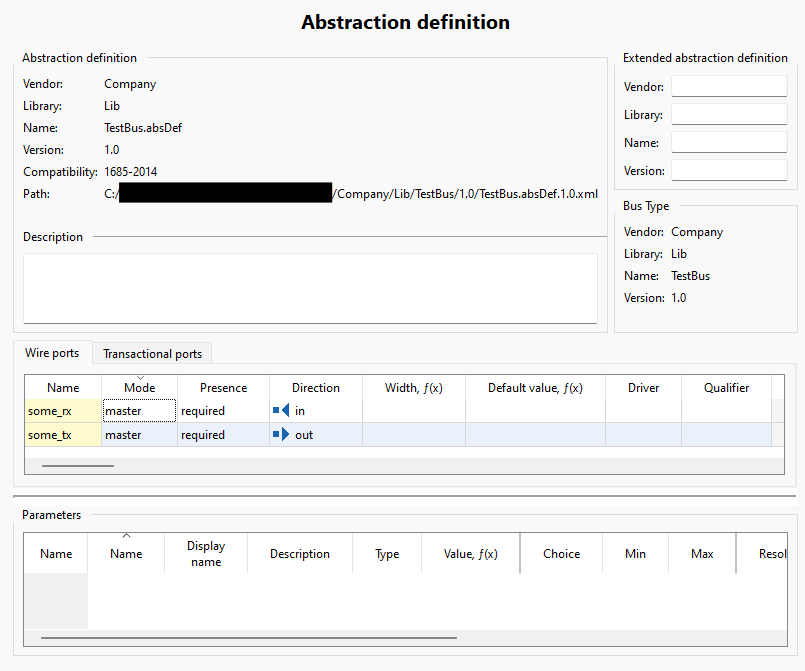
The bus definition created for this example is not modified in any way and its VLNV is Company:Lib:TestBus:1.0. The abstraction defintion is Company:Lib:TestBus.absDef:1.0. Here's the abstraction definition used:
Let's start by creating the physical component ports:

portsInterface = kactus2py.getPortsInterface()
portsInterface.addWirePort("some_rx")
portsInterface.setDirection("some_rx", "in")
portsInterface.setWidth("some_rx", "1")
portsInterface.addWirePort("some_tx")
portsInterface.setDirection("some_tx", "out")
portsInterface.setWidth("some_tx", "1")
# Let's add some unmapped ports as well
portsInterface.addWirePort("otherPort1")
portsInterface.setDirection("otherPort1", "inout")
portsInterface.addWirePort("otherPort2")
portsInterface.setDirection("otherPort2", "inout")
# Not setting any port bounds results in the port having width 1, which we want in this case

Now, let's create the bus interface:

busInterfaceInterface = kactus2py.getBusInterface() # gets the BusInterfaceInterface object
busInterfaceInterface.addBusInterface(0, "NewBusInterface") # Index doesn't really matter, as bus interfaces (should) have unique names
busInterfaceInterface.setMode("NewBusInterface", "master")

Before creating portmaps, the bus interface needs a bus type and at least one abstraction type. These are references to the bus definition and abstraction definition. In this example we'll use Company:Lib:TestBus:1.0 and Company:Lib:TestBus.absDef:1.0 :

busInterfaceInterface.setupSubInterfaces("NewBusInterface") # prepare subinterfaces for use
busInterfaceInterface.setBusType("NewBusInterface", "Company", "Lib", "TestBus", "1.0")
busInterfaceInterface.addAbstractionType("NewBusInterface", "Company", "Lib", "TestBus.absDef", "1.0")

Then, let's setup the portmaps. We'll simply map the logical "some_rx" to physical and the same with "some_tx". First, we need to setup the AbstractionTypeInterface, through which portmaps can be accessed. Abstraction types and portmaps don't have names, so indices are used to select the wanted abstraction type or portmap:

abstractionInterface = busInterfaceInterface.getAbstractionTypeInterface()
# Map only master mode ports with this master mode bus interface:
abstractionInterface.setBusMode("master")
# Setup portmaps and abstraction definition reference for wanted abstraction type.
# Ours is the first so it's found with index 0. Available abstraction types can be listed in the order of their index with AbstractionTypeInterface::getItemNames.
abstractionInterface.setupAbstractionTypeForPortMapInterface(0)
portMapInterface = abstractionInterface.getPortMapInterface()
# We need two port mappings: one for some_tx and one for some_rx
# The new portmap should be added to the end of the portmap list so that indices don't get messed up (though in this case it is just 0)
newPortMapIndex = portMapInterface.itemCount()
portMapInterface.addPortMap(newPortMapIndex)
# Map some_tx
portMapInterface.setLogicalPort(newPortMapIndex, "some_tx") # here "some_tx" refers to the logical port name set in the abstraction definition
portMapInterface.setPhysicalPort(newPortMapIndex, "some_tx")
# Add new port mapping for some_rx
newPortMapIndex = portMapInterface.itemCount()
portMapInterface.addPortMap(newPortMapIndex)
# Map some_rx
portMapInterface.setLogicalPort(newPortMapIndex, "some_rx")
portMapInterface.setPhysicalPort(newPortMapIndex, "some_rx")
# If no port mapping bounds are set, then the whole logical and physical ports will be used.

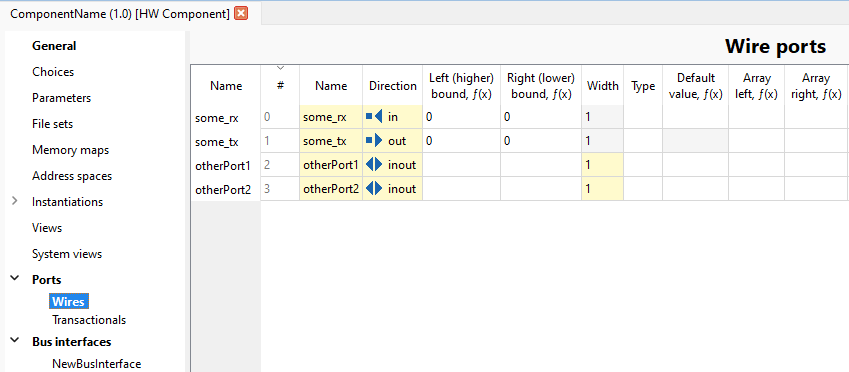
Resulting ports shown in GUI after running script:
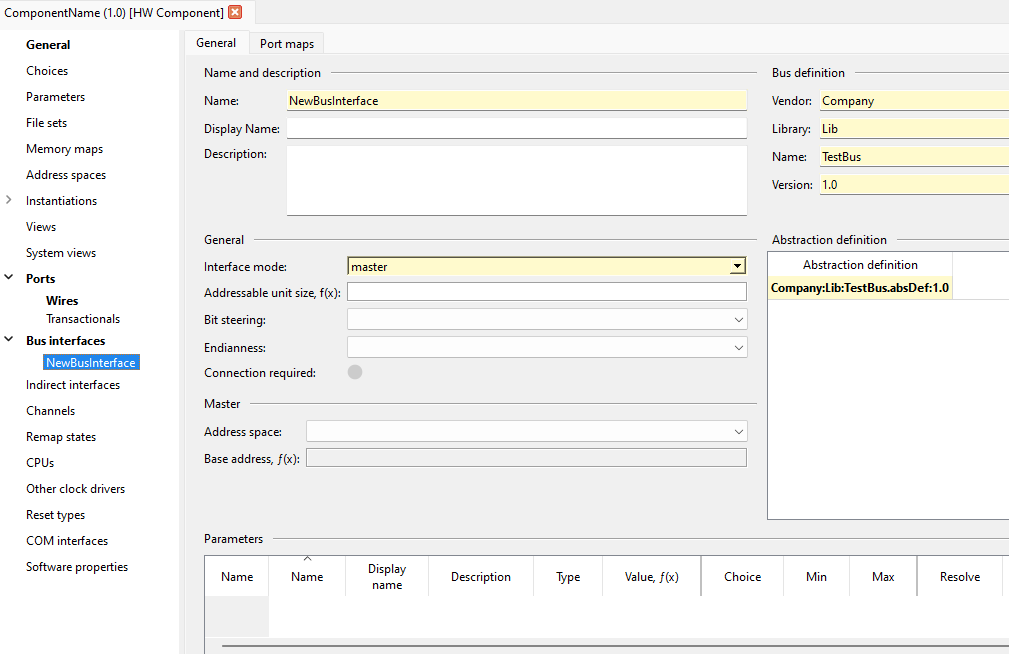
The created bus interface:
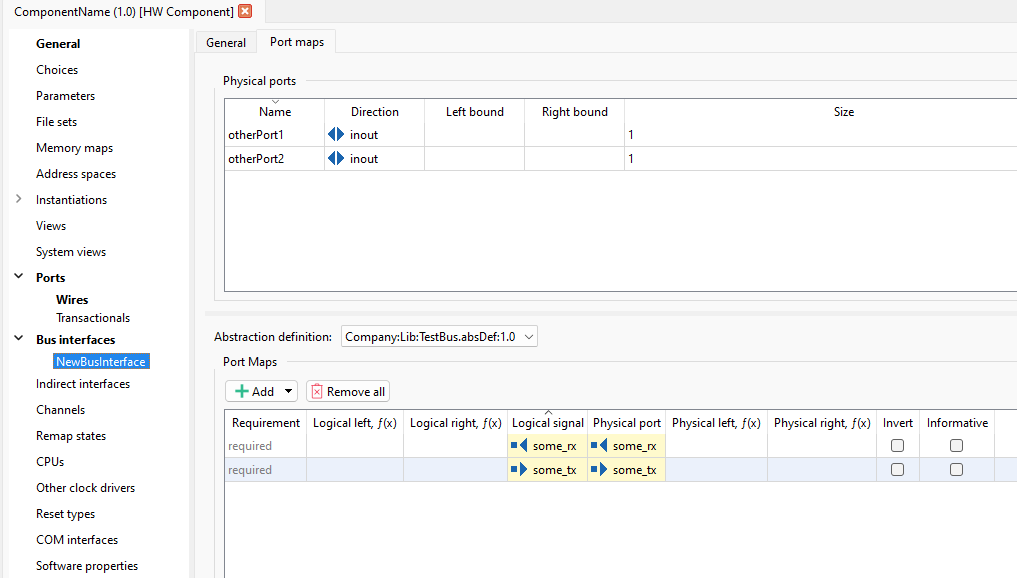
And the portmaps:
Practical example: Getting physical ports used in bus interface

Assuming we have a component with a bus interface with portmaps (like in the previous example), to print information of the physical ports a bus interface is using, we can do the following:

# Assume component has already been opened, and the component has the bus interface "NewBusInterface"
# Set up the sub-interfaces
busInterfaceInterface = kactus2py.getBusInterface()
busInterfaceInterface.setupSubInterfaces("NewBusInterface")
abstractionInterface = busInterfaceInterface.getAbstractionTypeInterface()
abstractionInterface.setupAbstractionTypeForPortMapInterface(0)
portMapInterface = abstractionInterface.getPortMapInterface()
numPortMaps = portMapInterface.itemCount()
foundPorts = []
for i in range(0, numPortMaps):
currentPhysical = portMapInterface.getPhysicalPortName()
print(currentPhysical)
foundPorts.append(currentPhysical)

Then the individual ports can be accessed with KactusAPI::PortsInterface:

portsInterface = kactus2py.getPortsInterface()
for i in range(0, numPortMaps):
print(portsInterface.getWidth(foundPorts[i]))

With the previous example, the above should print

some_tx
1
some_rx
1

Notice how the previously added extra ports otherPort1 and otherPort2 don't show up, because they weren't mapped to any logical signals.